Screen printing heat transfers can be a convenient way to boost your shop’s efficiency.
In the textile and t-shirt screen printing industry, plastisol heat transfers are one way to increase efficiency while serving your customers. If you already have a screen printing machine, you can create and use plastisol heat transfers with minimal investment in additional tools and equipment.
First the Basics: What Are Plastisol Heat Transfers?
Plastisol heat transfers are the reverse image of a screen print put down on specialized transfer paper. The ink on the paper is partially cured, and then when it’s ready to be placed on a substrate, the paper is placed facedown against the material and heated to around 400 degrees. The paper is peeled away, leaving the fully cured plastisol image behind on the substrate.
The Advantages of Using Plastisol Heat Transfers
While plastisol heat transfers won’t replace your normal screen printing operations, there are several applications that make plastisol heat transfers worthwhile. Plastisol heat transfers are ideal for applying a thick, crisp print on top of substrates that are otherwise difficult to print on, such as baseball caps and sports jerseys.
Plastisol heat transfers are also great for small batches of prints and when you’re unsure of which items or sizes you will need, such as for custom or event prints. If you’re creating your own custom images to sell individually, you can make up a large lot of heat transfers and then print on individual products as orders come in. Similarly, you can take heat transfers to events and apply the prints to shirts, hats or bags as purchases are made. In both instances, the plastisol heat transfers allow you to meet customer demand without overprinting a large number of items that will sit unsold in your shop.
Plastisol heat transfers can also be a time saver. Because the transfers place ink atop a surface, rather than allowing it to set in to the texture of the substrate, they are popular for mesh sports jerseys. That means you make heat transfers of simple block letters and numbers when you have some down time in your shop, then apply them quickly to jerseys when orders come in.
It’s Important to Know: How Are Plastisol Heat Transfers Made?
In order to successfully print with plastisol heat transfers it’s important to understand how they’re made. Plastisol heat transfers are made much like you would make any screen print, with some subtle changes. The primary difference with a heat transfer is that you’ll essentially be working your print backward, as the top layer of the heat transfer will be the bottom layer when it’s applied to the shirt. You’ll also be working to create a heavier ink deposit on the plastisol heat transfer than you would put onto a typical substrate.
You begin with a coarser mesh screen and you coat it heavily with your emulsion. There should be at least three coats of emulsion on the printing side of the screen and one to two coats of emulsion on the squeegee side of the screen. Working with a mirror image of your stencil, you will expose your screen, keeping in mind that exposure likely will take longer because of the heavier coat of emulsion.
And Now for Printing: The Basics for Success
To print, you’ll establish a higher off-contact distance on your screen printing press, generally around 1/16 of an inch. If you’re experimenting with heat transfers or only doing them on occasion, you can secure your transfer paper to the platen with a spray adhesive. If you plan to do a high volume of heat transfers or make them a regular part of your screen printing business, you’ll want to look into a vacuum platen that keeps transfer paper flush with your platen during printing. If you’re printing multiple colors, you’ll start with the top layer of your image and work your way down toward the base layer. You cannot print heat transfers wet-on-wet; you’ll have to flash cure between each color. For a clear print, apply your ink with one squeegee stroke, pressing down with medium pressure.
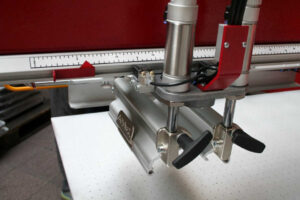
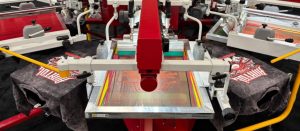
Anatol’s vacuum pallet system is perfect for holding
flat substrates like transfer paper in place for printing.
Once the plastisol heat transfer has been made, you’ll need to partially cure the image. That means heating your plastisol ink to between 180 and 240 degrees Fahrenheit. Your plastisol heat transfer will then be ready to apply to your final product.
How Do You Apply a Plastisol Heat Transfer?
Applying your plastisol heat transfer is a simple process, though there are two options for application: hot-split transfers and cold transfers. You’ll place your substrate into a heat transfer press and place your plastisol heat transfer in the desired location. With your heat transfer press set between 330 and 350 degrees Fahrenheit, you’ll press the heat transfer onto the substrate for 10 to 12 seconds. If you’re working with hot-split transfer paper, you’ll immediately peel off the paper, which will split the ink in two, depositing some on the substrate while leaving the remainder on the paper. This type of transfer provides a softer feel. With a cold transfer, you’ll allow the substrate and the transfer paper to cool for about 40 seconds before peeling the paper away. The entire plastisol transfer will remain on the shirt.
What Equipment Do You Need to Make Plastisol Heat Transfers?
Beyond your regular screen printing equipment, you’ll need very little in the way of supplies and equipment to make plastisol heat transfers. You’ll need screens with mesh counts between 86 and 156 and heat transfer paper. Some printers prefer to apply a transfer adhesion powder to their plastisol transfers before they’re partially cured. This can help the plastisol heat transfer to adhere to the final substrate more effectively. You’ll also be using your regular screen printing equipment: emulsion, squeegees, plastisol ink and your screen printing press. Of course, to apply your plastisol heat transfer, you’ll need a heat transfer press.
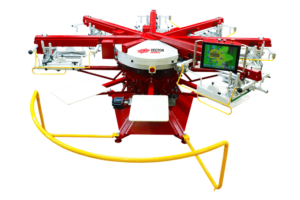
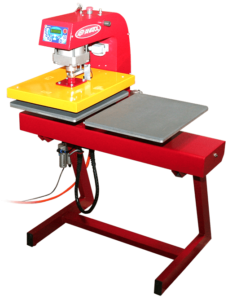
An automatic screen printing machine like the Anatol Vector, combined with the Anatol
Two Station Automatic heat transfer press will take the work out of high volume transfer.
How Do You Get Started with Plastisol Heat Transfers?
Once you’ve added the necessary supplies and equipment to your screen printing shop, you’re ready to get started with creating plastisol heat transfers. You should find it a simple process, as it isn’t very different from the normal screen printing process, but it may take some experimentation to perfect your plastisol heat transfers. Before you know it, you’ll be using plastisol heat transfers to make your shop more efficient and more profitable!


am participating on this .
Thanks for the great explanation. Anatol is always king. We got their 8/10 volt machine recently for yesweprint.com. Highly recommend for those who provide wholesale screen printing service.