No products in the cart.
en
Revolutionizing the screen printing industry through cutting-edge technology and quality service
Phone: +1 847-367-9760
Anatol Equipment Manufacturing Co.
1429 S Shields Dr
Waukegan, IL 60085
Revolutionizing the screen printing industry through cutting-edge technology and quality service
Anatol Equipment Manufacturing Co.
1429 S Shields Dr
Waukegan, IL 60085

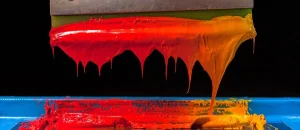
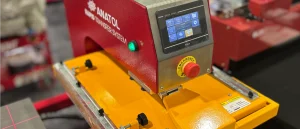
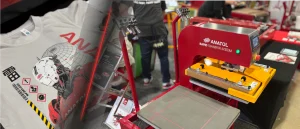
A flash cure unit allows screen printers to optimize their screen prints. With a flash cure unit, you can overlap your colors without unintended blending or put down an underbase for a more opaque print. Getting those optimal results takes some skill with your flash cure unit, and if you don’t know the ins and outs of using a flash cure, you may run into some problems with your prints. To help you perfect the flash cure process for screen printing, here are our Top 10 Tips for Getting a Proper Cure with Your Screen Printing Flash Cure.
First and foremost, you have to know when to use your flash cure unit. Some shops will flash cure with every multicolor print, even if the colors only abut, but this can mask registration problems and can lead to overheating your ink due to too much heat exposure, in addition to wasting valuable time. Flash curing should be used when you are laying down an underbase to increase the opacity of your print or when colors overlap and would muddle during your press run if you printed them wet-on-wet.
When flash curing your plastisol ink, you have to be careful not to raise the temperature of the ink so high that it begins to cure. The ink should be gelled so that it feels tacky but does not smudge or come off the garment when touched. Generally, that means bringing the temperature of the ink to a range between 240 and 250 degrees Fahrenheit. The gelled plastisol will allow subsequent layers of plastisol to adhere to it. If the ink begins to cure, subsequent layers of ink can have problems adhering to the print permanently.
To flash cure your ink the right temperature, you will need to adjust the amount and duration of the heat that reaches your pallet. For a faster cure on durable fabrics like 100-percent cotton, that means lowering your flash cure unit closer to the pallet. To avoid scorching or dye migration on synthetic fabrics or blends, that means adjusting your flash cure unit higher above the pallet but leaving it in place for a longer period of time. Generally, every time you double the distance between the pallet and the flash cure unit, you will quadruple the time needed to flash cure the ink. If you’re working with a new flash cure unit or a new fabric, finding the right temperature, distance and duration for flash curing might take some trial and error.
Just like fully curing your inks, flash curing is a precise science. If you don’t flash cure properly, not only will your flash cure not work the way it’s supposed to, you risk ruining your substrates or ruining your print. The best way to make sure you are flash curing properly is to measure your cure. With temperature tape, a donut probe or a heat gun, test your ink when you flash to make sure it’s coming to the ideal temperature. In addition to temperature, measuring time also can help. A simple stopwatch or kitchen timer can help you to be sure that you’re leaving your print under the flash cure unit for the proper amount of time, every time.
As heat builds up from your flash cure, it can impact more than your prints. Your pallet adhesive can break down if your pallet overheats during your press run. When your print job will involve flash curing, make sure you use a pallet adhesive that can withstand the heat.
If you are going to be flash curing during your press run, preheat your pallets before you begin your print job. Preheating your pallets will help with two things: First, it will begin to warm the substrate and the ink as soon as the ink is laid down; that means your prints will have to spend less time under the flash cure unit. Second, starting with a preheated pallet ensures that your flash cure time will be consistent throughout the press run. If you start with cold pallets, the first garments will have to sit under the flash cure longer. Once the pallets are hot, you’ll have to slow or stop your press run to make adjustments.
If the configuration of your press allows for it, include a cooling station after the flash cure. This will allow the tackiness of the ink from the residual heat to subside before you lay down the next layer of ink.
The temperature beneath a flash cure unit can be impacted by nearby drafts of air. Make sure that your flash cure unit is shielded from air conditioning vents or drafts from nearby windows. If your flash cure unit is unknowingly in the way of a vent, your ink might not come to the proper temperature to gel, interfering with your press run and your final print.
In addition to drafts, humidity can have an impact on your flash cure. Cotton garments, or garments with a cotton blend, will absorb moisture that’s in the air. When curing, or flash curing, that moisture will need to come out of the substrate before the ink can come to temperature. Use a dehumidifier in your shop to combat humidity, or be aware that on humid days, you might have to flash cure for longer, or you might consider running cotton garments through the conveyor dryer before printing to evaporate out any residual moisture.
How hot does your shop get during a press run? With the presses humming, the flash cure unit running and the conveyor dryerhard at work, chances are that your shop gets hotter throughout the press run. If you shop heats up, your print will need less time under the flash cure unit. Either be sensitive to the fact that you might have to adjust the flash cure during long press runs, or take measures to keep the temperature down in your shop.
Your flash cure unit is a valuable tool in your screen printing shop. Take the time to learn how to use it properly to get the most from your flash cure unit and to improve the quality of your screen prints.
Your message was successfully sent!