You might think your press alone determines your print quality – but your exposure unit plays a big role too!
All exposure units work on the same principle: providing a source of UV light to cure the emulsion around your graphic so that you can produce a sturdy stencil. Exposure units vary widely, however, on how they produce that UV light. The different types of lighting used in the units determine the initial purchasing price of the unit, the exposure time and the maintenance costs associated with the unit, as well as the crispness of the stencil itself.
While many shops initially rely on fluorescent exposure units because of their low costs, shops looking to up their production and their efficiency eventually will look at a more powerful unit that produces crisper stencils faster. These days, that generally means choosing between a metal halide or an LED exposure unit. To choose the right exposure unit, you’ll need to understand the differences between the two types of exposure units and how they’ll affect your shop.
Metal Halide Exposure Units: The Old Standby
For years, metal halide exposure units were the best in the screen printing industry, and they still rank among the best screen exposure units. Metal halide exposure units use a high-wattage single-source bulb to quickly cure screens. Because they provide a single source of intense UV light, metal halide exposure units create stencils with crisp edges, so they’re ideal for producing screens for highly detailed print runs.
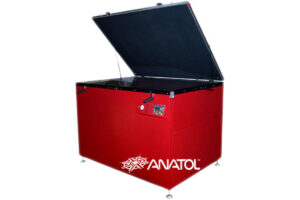
Anatol’s user friendly Metal Halide exposure unit is perfect
for producing crisp stencils with even, consistent exposure.
The primary downside to metal halide exposure units is cost, both in terms of the initial purchase and the cost of operation and upkeep. Metal halide bulbs take time to warm up, and turning the bulbs on and off causes them to burn out faster. Because of the high cost of bulbs — which can cost between $200 and $300 — and the warm-up time, some shops keep their exposure units running all day, which places a burden on the shop’s electrical usage. Metal halide bulbs do dim in intensity as they age, leading to longer exposure times, and it’s recommended that the bulbs are replaced every one to three years.
LED Exposure Units: New Technology on the Rise
For the past few years, the popularity of LED exposure units has been growing. The UV light created in LED exposure units is created by light emitting diodes rather than traditional light bulbs. For screen printing exposure units, the diodes used are designed to create the perfect wavelength of UV light, which means emulsion can cure within a matter of seconds or a matter of minutes.
Anatol’s Aurora UV LED exposure unit will expose
your screens quickly, efficiently and with sharp detail.
LED exposure units offer an operational cost savings over metal halide units. The units take much less power to operate — an estimated one-fifth of the operating energy of metal halide units — and they require no warm-up time, which means they don’t have to be left running all day. LED exposure units don’t have bulbs that require regular replacement and the UV light produced doesn’t weaken over time.
There are some potential drawbacks to LED exposure units, however. Some in the screen printing industry believe that creating a crisp stencil requires a strong single point of UV light, like that created by a metal halide bulb. LED exposure units provide all over UV light. LED units also provide UV light at a very specific wavelength; some claim that a good cure requires a range of UV light. However, manufacturers maintain that there is not a noticeable difference in stencil crispness between LED and metal-halide exposure units.
Selecting the Right Exposure Unit
Which exposure unit you select will depend on your shop’s needs. You’ll want to consider different options, such as vacuum suction to hold positives to the unit or vertical space-saving units. As you narrow down your choices, you can request to have some of your shop’s screens exposed on the units you’re considering so that you can compare the stencil and print quality. Whichever exposure unit you select — a metal halide or LED unit — if you’re upgrading from a fluorescent unit, you’ll see a marked improvement in your screen quality and your exposure efficiency.
You’ll also have to consider the size of the screens you’ll be exposing, not just now, but in the future too. If you’re thinking about upgrading your press sometime soon, you may need to expose larger screens than you’re currently using. Plan ahead so you choose equipment your shop can grow with.
Like any piece of equipment you’ll add to your screen printing shop, pay attention to the power requirements when selecting an exposure unit. Before you buy, make sure your shop can handle the additional electrical demands – some units require standard 110 volt power, others need 220. Without electricity, an exposure unit is nothing more than an expensive paperweight!
Whether you’re leaning towards metal halide or LED, we’ve got you covered. Need some help choosing the perfect exposure unit for your shop? Let’s figure it out together!
Looking for some tips on getting the best results from your exposure unit? Check out this blog post
30 Comments
We are long table screen printer and our table length is 20 meter and 72 inches wide. When we print clear binder + color or white titanium based colors the screen has blocked or choked on 2nd round (means the holes from which color comes out are blocked) we used mineral oil and other oils mixed in with print paste but the problem not solved. Can you give us suggestions to overcome this problem.?. thanks.
I screen-print wallpaper, and envy you your long table! If you use water based inks/pigments lighter colours have a tendency to block more easily. A couple of years ago UK paint manufacturers Farrow and Ball – who also print wallpaper using their own emulsion pigments- advised me to use Fluotrol, which increases the paint flow without reducing the viscosity. It works, and I pass on their recommendation!
Try glycerin, 1 TBS / 8 oz with any water-based paint.
This was great info, i mostly do car decals but also have been screen printing for 8 years
Happy to hear it was helpful!
Which mesh is good for wedding invitation printing
Depending on what your design looks like, you will probably want to choose a higher mesh count screen for capturing fine details like text.
It is possible to produce halftone CMYK colors in 120Mesh 48threads?
Hi Chris, you’ll want to use higher mesh count screens for CMYK. It’ll be difficult to get a good result with mesh that coarse, the halftone dots would just be too big. 305 is recommended but nothing less than 200.
I wouod like to start screen printing signs instead of stenciling. They are not very detailed and in larger font size. What size mesh and would a thinner or thicker ink be best?
Thanks bunches!
Cris
What material would the signs be made of? UV or air-dry inks are good choices for signs. UV ink is thinner and typically requires a higher mesh count. The amount of detail in your design also plays a role in determining the ideal mesh count. Would the designs be simple or complex?
Hi Alex,
I am planning to start tshirt screen printing business, and have no experience in about it, can you suggest one standard mesh count that can be used for fine detailed CYMK graphics as well as bold logo type designs.
Thanks
Hi Rajeev, there really is no standard mesh count you can use for both CMYK and bold logo designs. You’d need a finer mesh count (305 is typically recommended) for four color process printing and a coarser mesh for less detailed prints. You can learn more about CMYK screen printing here: https://anatol.com/what-you-need-to-know-about-four-color-process-screen-printing/
Hi Alex I am planning to start non woven bag screen printing business, and have no experience in about it, can you suggest one standard mesh count and what kind of ink that can be used for
Hi Ojit, these will be nylon bags? The mesh count will depend heavily on how detailed your designs are. There are special inks that are made specifically for printing on nylon, or you can use plastisol with a low cure additive to reduce the required curing temperature so you don’t damage the bags.
Hi! What size would you suggest for printing on throw pillow covers? They are white or cream and canvas like fabric.. Thanks, Kaitlin
Hi Kaitlin, how detailed is the design?
I want to print on t-shirts and I want a very detailed design, what mesh count should I use? And what do I have to keep in mind?
Hi George, what kind of ink are you looking to print with?
Hello Im trying to make a print on a black canvas bag for a reunion. The letters are small but block. Im having a problem with washing out. Some letters are perfect but some arent. Could the emulsion not be applied properly or is it the screen Im using..? Please help have 5 days to produce 50 bags.
What kind of emulsion are you using?
It was probably underexposed.
SIT 1 — Ready Mix Emulsion
• Exposure Time: 1min-2mins.
SIT 2 — Dual Cure Emulsion
Exposure Time: at least 6 mins
Good day admin,
Do you have a discussion about right eposure time,height from the lamp to the screen,and what is the most effective light source(flourescent,flood light, and etc.).im using glue ang sensitizer as emulsion..tnx for the reply in advance .
Hi I just started screen printing business to print a tshirts I am confused about what kind of mesh, emulsion should I use, right now I have plastisol colour & I am printing not so detail image can you please help me with the situation
Hi Dharmesh,
Are you saying your artwork is basic without any fine detail, or when you try to print, you are losing the fine details?
Alex
Hi
I’d like to do photorealistic, fine detailed silk screening on plywood for a pinball machine.
Whilst the cabinet sides are fairly straight forward and are to be completely covered in graphics, the playfield will have areas and spots which are not to be covered by any paint.
I assume I need a base coat first to make sure that the grains of the wood does not show through the paint. Reading your (very good) article, would it be correct to do this with a lower count mesh as the level of detail is farily low for the base coat?
What mesh count would you recommend for the other colors?
At first I thought that CMYK silk screen printing was the way to go but then I found an article that said that SIM Process Screen Printing have more or less replaced CMYK. I would be curious to hear your opinion and recommendation regarding that.
I am printing a T shirt with 400 last names. Clearly tiny text. Any suggestions on mesh size and paint?
Hi sir
i wanna print polyester satin Lable
can you help me which mesh is good , design is simple 1 inch logo and small text
thanks
For a logo that small with very small text, you’ll want to use a higher mesh count screen. What type of ink are you using?
Nice straight forward info. Thanks. I did a bunch of “silkscreen” in the 70’s and was wanting to catch up before I take a shot at putting a logo in my truck; you know, what’s new and current in the process. Appreciate your efforts here!