Корзина пуста.
ru
Revolutionizing the screen printing industry through cutting-edge technology and quality service
Phone: +1 847-367-9760
Anatol Equipment Manufacturing Co.
1429 S Shields Dr
Waukegan, IL 60085
Revolutionizing the screen printing industry through cutting-edge technology and quality service
Anatol Equipment Manufacturing Co.
1429 S Shields Dr
Waukegan, IL 60085

A flash cure is an important tool for your screen printing shop, especially if you’ll be tackling multicolor prints or plastisol on dark garments. If you want a vibrant plastisol print on a dark shirt, you need an underbase, and if you need an underbase, you’ll probably need a flash cure. But make sure your flash doesn’t become a crutch; overreliance on flashing can cripple your production. You need to choose the right flash and the right time to use it!
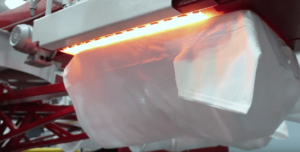
Flash cures can generally be divided into two categories based on the type of heating element: infrared panels or quartz tubes. The price of a flash is largely determined by the type of heating element it employs. Infrared flashes are cheaper but may not cure as quickly as quartz flashes. Quartz flashes heat up and cool down faster than other types of flashes, saving time and energy.
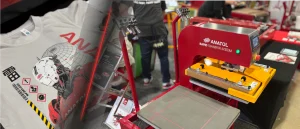
Besides differences in heating elements, flash cures are also divided into models appropriate for manual presses, automatic presses or both. When choosing a flash, make sure it’s compatible with your press! Flash cures are designed to fit into a press in different ways. Some plug right into a print station on an automatic press, allowing you to operate the flash straight from the press’s control panel. In most cases, flashes like this will take the place of the print head — so if you have a four color press, a flash cure will reduce you to three colors. There are some flashes designed to fit in a print station so it can be used to both print and flash. Some flash cures are separate from the press, available on wheeled stands so you can position them as needed. Others fit in between print stations, so you can flash without losing a color.
Also known as «flash dryers», this term is somewhat misleading. Flash cures aren’t meant for fully drying prints; they’re designed to let you partially cure, or «gel», a layer of plastisol ink so you can print another layer on top. This gelled ink will be cured just enough so you can’t pick it up on your finger, but it’ll still be soft and malleable so subsequent layers will adhere properly.
Whether you need to flash your print or not is largely determined by your artwork. If the colors in your design are laid out edge to edge («butt registered») but do not overlap, flash curing probably isn’t necessary. The main reason for flashing a print is to cure an underbase so you can print other colors on top. If you’re not printing colors in overlapping layers, flashing after each color can be a big waste of time. In this case, you most likely can eliminate flash curing altogether.
While it is possible to fully cure your prints with a flash, a conveyor dryer is more appropriate. A conveyor dryer will let you cure a higher volume of garments with more speed and efficiency, and with less chance of scorching the shirts. If you’re just starting out and really pressed for space, you may use a flash cure in place of a conveyor dryer for plastisol. However, this isn’t a long term solution and as you print higher volumes you’ll need a conveyor dryer to properly cure your print jobs.
If you’re not using it efficiently, a flash cure can waste energy. A key feature that’ll help you conserve power is the ability to turn on and off individual zones of the flash. For example, if you’re printing a small chest design, you don’t need to expend excess energy flash curing the entire front of the shirt. A flash cure with selectable heating zones will heat only the area you need. You should also look for a flash with precise time and temperature controls to help maximize efficiency and eliminate scorched garments from over-flashing.
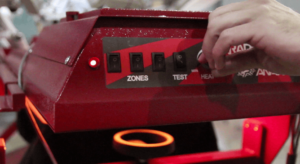
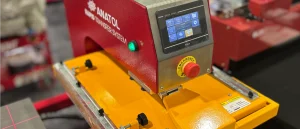
Anatol’s Rapid Wave quartz flash gives you three independent
heating zones to choose from and allows you to fine-tune temperature.
Another feature you’ll want to look for is insulation. A fully insulated flash will keep the unit from heating up to reduce the chance of operators being burned. Insulation also keeps heat from dissipating in your shop, saving energy and keeping working conditions comfortable.
During a print run, you’ll probably need to periodically adjust the flash time or temperature. As the run goes on, the pallets will heat up and change the required flash temperature. Keep a close eye on the temperature of your ink — follow the ink manufacturer’s instructions and avoid over-flashing. If you cure your ink too much between colors, the top layers of ink may have trouble adhering to those underneath. Make sure your flash is level so one side of the shirt doesn’t receive more heat than the other; you can end up scorching your garments. If your flash doesn’t have controls for time and temperature, you can make adjustments by raising or lowering the height of the flash.
If you’re working in a warm shop, you might have a fan or open window circulating cool air to make your work space more comfortable. Make sure the cool air doesn’t affect the flash — you don’t want to waste energy by flashing longer than necessary to compensate for the cooler temperature.
Before you finish the curing process in the conveyor dryer, take into account that the prints may still be hot from the flash. Either let them cool down or adjust your conveyor dryer temperature accordingly so you don’t overheat your shirts and damage your prints.
There are so many varieties of flash cure to choose from, it can be overwhelming! You want to make sure you find the perfect model to meet your specific printing needs, so it becomes a helpful tool and not a waste of time and energy. Want to learn more about flash cures, when to use them and what type is right for you? We’re here to help, let’s talk!
For more tips on properly curing plastisol ink, check out this blog post
Your message was successfully sent!