
Революция в индустрии трафаретной печати благодаря передовым технологиям и качественному обслуживанию
Anatol Equipment Manufacturing Co.
1429 S Shields Dr
Waukegan, IL 60085


Революция в индустрии трафаретной печати благодаря передовым технологиям и качественному обслуживанию
Anatol Equipment Manufacturing Co.
1429 S Shields Dr
Waukegan, IL 60085

We have seven screen printing practices you should employ with each print run to improve the quality of your products and reduce wasted time and inventory due to misprints.
The screws that hold your screen printing press together can come loose with the constant motion of the machine. It’s not uncommon for the screws that hold pallets and screens in place to loosen during your printing runs. Those loose screws allow pallets and screens to wiggle during printing which can cause blurred prints.
You won’t have a quality screen print if you don’t start with quality artwork. The image being printed should be high resolution. If the resolution is too low, the image will seem fuzzy on the substrate, no matter how well you print. Similarly, the colors must be properly separated. Your product will not have proper registration if you don’t start with properly separated colors.
Different screen printing jobs call for screens of varying mesh counts. Often, printers are sold on one type of screen, but more accomplished shops keep several in their inventory, ranging from the standard 110 mesh count and under to 400 and up. While the lower mesh count will suffice for most jobs, finer screens are needed to achieve more detailed screen prints, halftones, gradients and photorealistic screen prints.
Once you have the right screen selected, it’s important to check your screen tension before you begin printing. Over time, the tension on screens can loosen, which can cause problems including blurred prints or rough-feeling ink on your final product. Some screens can be tightened, while others may need to be replaced.
To get a crisp screen print on your final product, you need to set proper off-contact before you start printing. Off-contact is the distance between your screen and the pallet below. It allows your screen to come gently in contact with your substrate while printing and pull cleanly away, leaving a precise print behind.

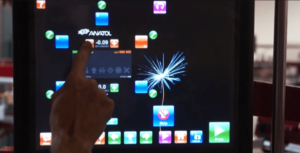
With the Anatol VOLT, all it takes is the
press of a button to set exact off-contact
The precise off-contact distance depends on your substrate. For most t-shirt printing jobs, you will set an off-contact distance of 1/16 inch, and for printing on thicker substrates like sweatshirts your off-contact distance will be closer to 1/8 inch. Anatol makes exact off-contact adjustments simple. All of our presses come with tool-free off-contact — letting you set the perfect off-contact for each job by hand. And with the VOLT‘s digital off-contact, making adjustments as fine as .001″ is as easy as pressing a button on the touchscreen!
Learn more about off-contact here.
The angle at which you hold your squeegee while manual screen printing can have a big impact on your ink deposit, as can the pressure you exert on the squeegee while pushing or pulling. If you prefer to push your ink — working the ink away from you on the screen as you print — the squeegee has to be held at a 45-degree angle, or the ink will not penetrate the screen to the substrate. When pulling — working the ink toward you on the screen — the squeegee should be held somewhere between a 45- to 80-degree angle. Generally, the higher the angle, the less ink will be printed onto the substrate, and the lower the angle, the more ink will be printed.
When pushing or pulling your ink, the goal is to apply enough pressure to deposit an even layer of ink on the substrate. Too much pressure can bend the screen, blur the print or leave behind too much ink. Too little pressure won’t push enough ink through the screen and will result in a partial or faint print.
Learn more about pushing vs. pulling here.
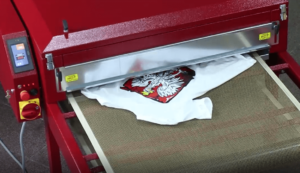
Just running your printed products through the dryer isn’t enough to ensure that they have been properly cured. Most plastisol inks need to be heated above 320 degrees to fully cure. Each ink should come with the manufacturer’s recommended curing temperature. Thicker prints might need more heat for longer, while lighter prints won’t require as much dry time. You can check the temperature of your ink as it comes out of the dryer with a heat gun or a heat strip, but keep in mind that the internal ink temperature needs to reach its curing heat as well as the surface ink.

To cure your ink with maximum efficiency, you
need a conveyor dryer like the Anatol Solutions
You should test each run of products for proper curing to be sure you are supplying your customers with a print that won’t crack or peel. The simplest way to check your curing is with a stretch test: stretch the cured and cooled shirt until the ink stretches slightly. The ink should not show signs of cracking. If you are trying out a new ink or a new dryer, you may want to perform a more thorough testing of your curing by washing a shirt several times to make sure the ink holds.
It doesn’t matter if it’s a simple one-color job or a reprint of a project you’ve done before. You should do a test before every screen printing run. Your test run will make sure that your registration is spot on, your press has been properly set up, your screens are tight and clean, and your dryer is fully curing your inks. It’s much easier and cheaper to make adjustments after a test run than to have to throw away some or all of an entire screen printing run.
The time you invest in a test run is time well spent. With proper graphics, setup, technique and testing, you can be confident that your screen printing press will be churning out top-quality products for your customers.
Here at Anatol, our goal is to make setting up and printing your projects as easy as possible with equipment designed for maximum user-friendliness. Want to learn more about how our screen printing machines can simplify your job by letting you print smarter? Let’s have a conversation!
Your message was successfully sent!